So, lets get down to it, here is what my solution will consist of:
- Synology Disk Station 211J
- 2 x Samsung Spinpoint F4EG 2 TB SATA2 5400rpm 32 MB Hard Drive
- Samsung 2TB STORY Station 3.0 External Hard Drive
I chose the Synology because I wanted to be able to do RAID 1 to deal with a single drive failure, I've had a couple of drives fail on me in the past and I'd prefer to not get bitter again. I had originally settled on the DS210J but just as I was about to purchase it the replacement DS211J came out. I also chose it because it supported Time Machine Backups, a must for my MacBook Pro , has backup software for the PC and supports duplication to a USB drive attached.
The hard drives I chose because that was part of the package I got offered but basically I'd narrowed it down to Samsung or Western Digital 2TB green drives, I'm not too concerned with losing a bit of speed with the 5400 RPM drives because I'm pretty sure my shitty wireless network is going to be my biggest bottle neck anyway and I am not fussed with losing a bit of speed to save a bit of energy.
I'd like to say I put a lot of thought into the external drive, but to be honest I didn't really, the Samsung Story ticked all the boxes though, good price, fast (USB 3.0) and award winning.

The contents of the Disk Station box isn't all that surprising the DS211J itself a power supply, power cable, ethernet cable, some screws and a minimalist getting started guide. The getting started guide consisted of instructions to check the website and then read stuff on the enclosed CD.
It's very easy to put the drives in, made even easier because of a nice touch by Synology, they haven't secured the case shut, so when it first arrives you can simply slide the case off and get to work installing the drives. All it takes is a quick push on each drive to slide it into position and a couple of screws on each side.

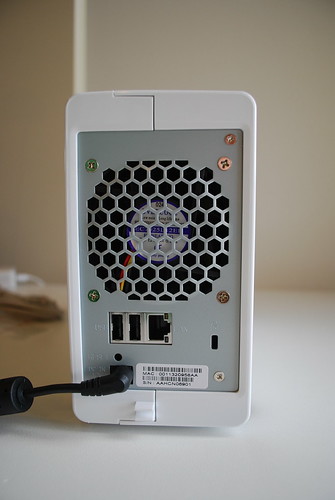
Then to complete the hardware installation simply plug in a LAN cable and the power adapter and power the DS211J up, from now on the rest is software setup. There is another nice touch on the back of the case a clip to hold the power cable, although I did struggle a little to get the power cable locked in, it is a nice feature that gives a little guarantee that you won't knock out the power cable in the middle of a big data transfer or backup.
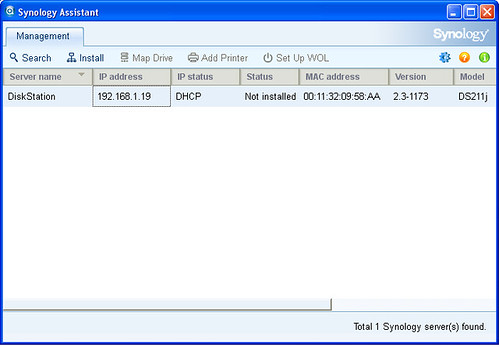
You are guided through the software installation by the "Synology Assistant" which contains a setup wizard that automagically finds your device on the network and then guides you through configuring the IP, name, passwords etc. Once you complete the wizard it goes of and formats the drives and sets them up.
After the drives have been setup and the software installed on your DiskStation by the assistant you can connect to the web management interface. Here the first stage is to setup your drive volumes. I'm going with RAID1 so I'll have 1.81 TB of usable storage space (Damn those drive manufacturers for using dodgy drive size measurements). I also could've with RAID 0 for speed and no redundancy or Synology Hyrbid Raid, a software raid that Synology have written themselves that allows you to use RAID with drives of different sizes. Once I picked the volume setup and type I left it to create the volume for me.
Unfortunately I ran out of time this morning to finish the setup and this is where left it, I'll continue on in Part 2 of my review and setup when I get a chance to do it. There I should cover stuff like setting up Shared Drives for media (so that I can use Media Rover), setting up my Windows PC to automatically backup and setting up Time Machine on the Powerbook.
You can continue reading in part two of the setup.
Nice! Looking forward to see the rest. Good work!
ReplyDelete"I chose the Synology because I wanted to be able to do RAID 0 to deal with a single drive failure, I've had a couple of drives fail on me in the past and I'd prefer to not get bitter again."
ReplyDeleteRAID 0 is striping which is more likely to fail than a single drive. I think you mean RAID 1 which is mirroring.
Whoops, my bad. Thanks for pointing that out.
ReplyDeleteRaid 1 will fail too. I have just experience it. So it is the best to have another backup.
ReplyDeleteDoes anyone know if I can remove hard drives and use them outside DiskStation 211J? Let's say the 211J itself failed and I want to get to my data.
ReplyDeleteThanks!
Hi,
DeleteYes thats possible. Synology diskstation stores the data in EXT2/3 (cant remember which) which is a linux file format.
This means if your diskstation gives up the ghost, you can attach the drive to a linux machine.
dont forget if you encrypt any folders you will require the encryption key to access them on another machine.
Hope that helps?
Use Raid 0 work perfect in my server 2 drives from 3 TB each
Delete